The Secret to Welding Steel to Aluminum
americanindustrialsupl and its partners may earn a commission if you purchase a product through one of our links.
Not all metals are easy to weld together. Some metals have different physical and chemical properties that make them incompatible for welding. One of the most challenging combinations of metals to weld is steel and aluminum.
Steel and aluminum are very different metals with respect to their melting points, thermal conductivities, expansion coefficients, and solubilities. These differences pose significant challenges for welding them together using conventional welding techniques, such as arc welding, MIG welding, or TIG welding. If you try to weld steel and aluminum directly, you will end up with a weak and brittle joint that will crack and fail under stress.
However, this does not mean that you cannot weld steel to aluminum at all. There are some workarounds and alternatives that can help you achieve a strong and durable joint between these dissimilar metals. Below, we will reveal the secret to welding steel to aluminum and show you how to do it step by step.
We will also cover the factors that affect the quality of the joint, the benefits of welding steel to aluminum, the types of welding that can be used for this purpose, the tools and equipment that you need, the safety precautions that you should take, and the common mistakes that you should avoid.
By the end of this article, you will have a clear understanding of how to weld steel to aluminum and be able to apply this knowledge to your own projects. Whether you are a professional welder or a hobbyist, this article will provide you with valuable information and tips on welding dissimilar metals.
Why Weld Steel to Aluminum?
Before we get into the details of how to weld steel to aluminum, let us first understand why you would want to do it in the first place. What are the advantages of welding steel to aluminum?
The main reason why you would want to weld steel to aluminum is to reduce weight while maintaining strength. Steel is a strong and durable metal that can withstand high loads and stresses. However, steel is also heavy, having a density of around 7.8 g/cm3. This means that a comparable volume of steel is about three times heavier than aluminum, which has a density of around 2.7 g/cm3.
Weight Reduction
Weight reduction is important for many applications, especially in the transportation industry. By reducing weight, you can improve fuel efficiency, performance, and environmental impact. For example, in the automotive industry, replacing some steel parts with aluminum parts can reduce the weight of a vehicle by up to 10%, which can result in up to 7% improvement in fuel economy. Similarly, in the aerospace industry, using aluminum alloys instead of steel can reduce the weight of an aircraft by up to 20%, which can increase its range and payload.
However, replacing steel entirely with aluminum is not always possible or desirable. Some parts may require the strength and durability of steel, while others may benefit from the lightness and corrosion resistance of aluminum. Therefore, there is a need to join these two metals together in a way that maximizes their advantages and minimizes their disadvantages.
Welding is one of the most effective ways to join metals together because it creates a strong and permanent bond between them. However, as we mentioned earlier, welding steel to aluminum is not easy due to their different properties. Therefore, we need to use some special techniques and methods to overcome these challenges.
How to Weld Steel to Aluminum: The Secret Revealed
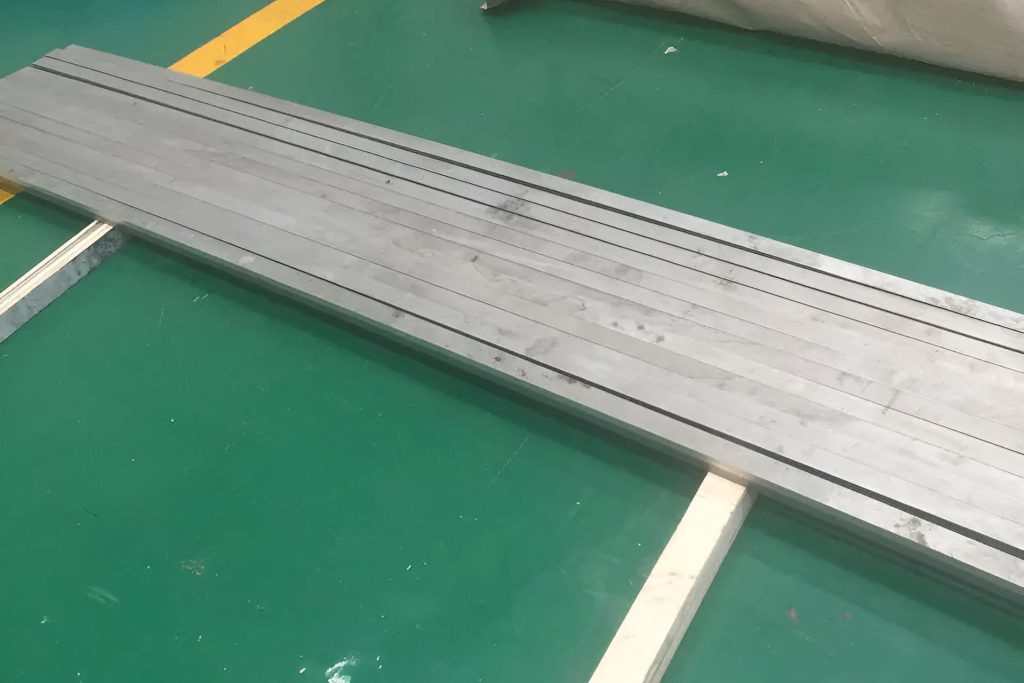
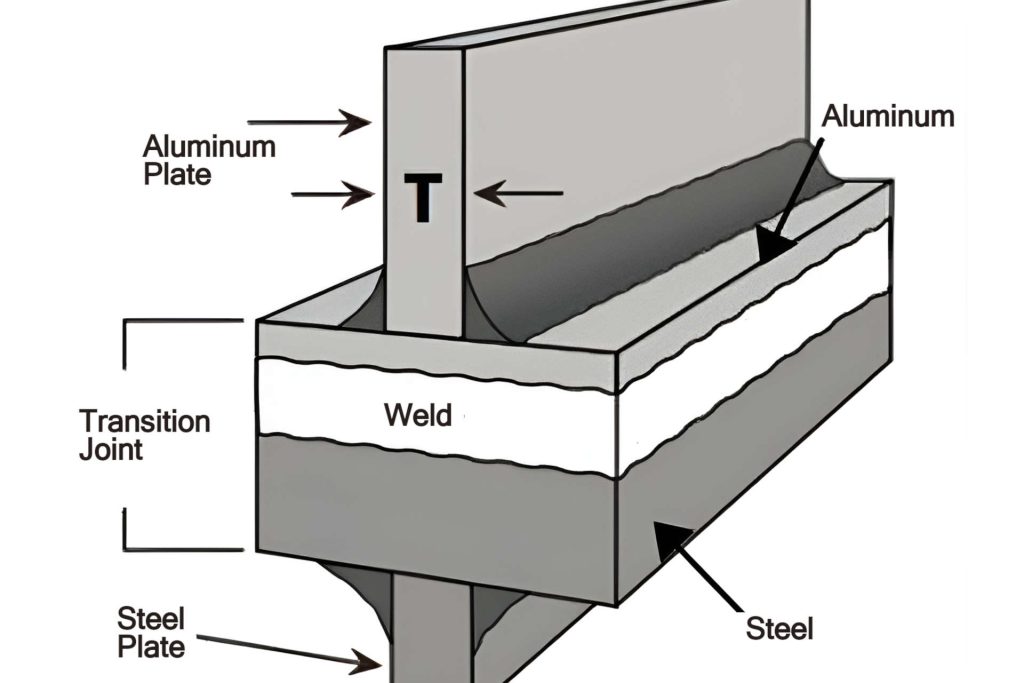
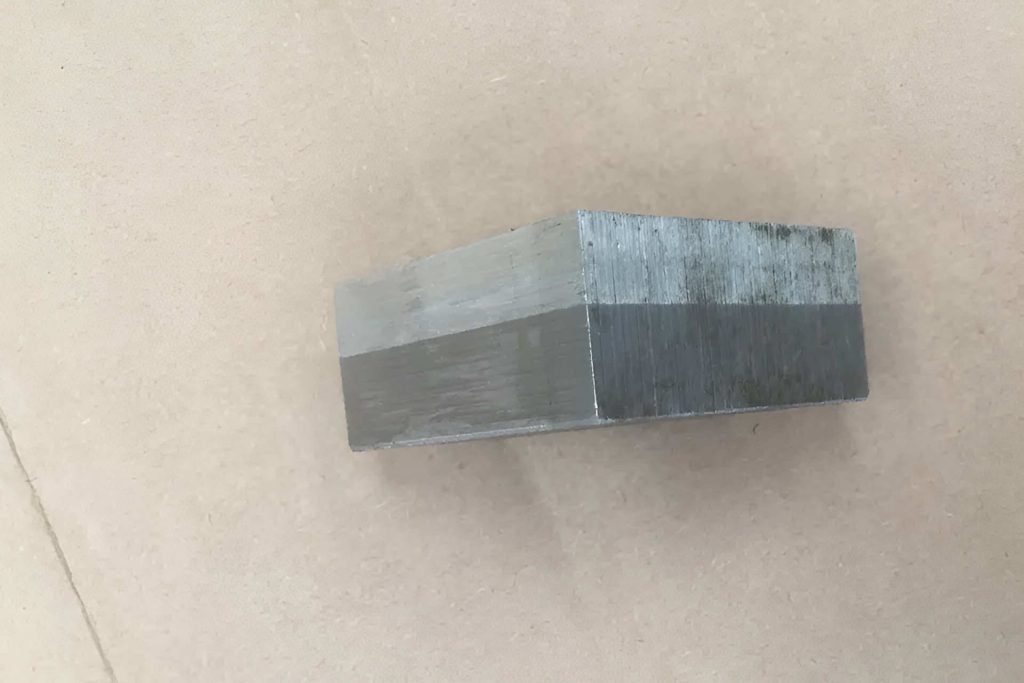
The secret to welding steel to aluminum is using bimetallic transition inserts. These are special pieces of metal that have steel on one side and aluminum on the other. They are pre-bonded by using a hot rolling or hot pressure welding technique (also known as explosion welding). These techniques create a metallurgical bond between the two metals without melting them.
Bimetallic Transition Inserts
Bimetallic transition inserts are thick enough that you can use regular welding techniques (such as GMAW or GTAW) to weld them to their respective metals. For example, you can use GMAW (MIG) or GTAW (TIG) to weld the steel side of the insert to a steel part, and then use the same technique (with different filler material) to weld the aluminum side of the insert to an aluminum part.
By using bimetallic transition inserts, you can avoid the problems associated with direct welding of steel and aluminum, such as melting point mismatch, intermetallic formation, thermal expansion mismatch, etc. The inserts act as a buffer zone between the two metals and provide a smooth transition from one metal to another.
Bimetallic transition inserts are widely used in various industries where welding steel to aluminum is required. Some examples are ships, heat exchangers, pipelines, etc.
Step-by-Step Guide to Welding Steel to Aluminum Using Bimetallic Transition Inserts
Now that you know the secret to welding steel to aluminum, let us show you how to do it step by step. Here are the tools and equipment that you will need:
- A GMAW (MIG) or GTAW (TIG) welding machine
- A bimetallic transition insert (steel-aluminum)
- A steel filler material (such as ER70S-6)
- An aluminum filler material (such as ER4043)
- A welding torch
- A welding helmet
- A pair of welding gloves
- A pair of welding pliers
- A wire brush
- A grinder
- A clamp
Here are the steps that you should follow:
- Prepare the steel and aluminum parts that you want to weld together. Clean them with a wire brush and a grinder to remove any dirt, rust, paint, oil, or grease. Make sure that the surfaces are smooth and flat.
- Prepare the bimetallic transition insert. Cut it to the size and shape that you need. You can use a bandsaw, a hacksaw, or a plasma cutter for this purpose. Make sure that the edges are smooth and straight.
- Clamp the steel part and the steel side of the insert together. Align them properly and make sure that there are no gaps between them.
- Set up your welding machine according to the manufacturer’s instructions. Choose the appropriate welding technique (GMAW or GTAW), current, voltage, wire feed speed, gas flow rate, etc. for welding steel. Load the steel filler material into the welding torch.
- Put on your welding helmet and gloves. Start welding the steel part and the steel side of the insert together. Use a steady and consistent motion and create a uniform bead along the joint. Make sure that you have good penetration and fusion between the two metals.
- Let the weld cool down completely. Remove the clamp and inspect the weld for any defects, such as cracks, porosity, lack of fusion, etc. If you find any defects, grind them out and re-weld them until you have a sound weld.
- Flip over the assembly and clamp the aluminum part and the aluminum side of the insert together. Align them properly and make sure that there are no gaps between them.
- Set up your welding machine according to the manufacturer’s instructions. Choose the appropriate welding technique (GMAW or GTAW), current, voltage, wire feed speed, gas flow rate, etc. for welding aluminum. Load the aluminum filler material into the welding torch.
- Put on your welding helmet and gloves. Start welding the aluminum part and the aluminum side of the insert together. Use a steady and consistent motion and create a uniform bead along the joint. Make sure that you have good penetration and fusion between the two metals.
- Let the weld cool down completely. Remove the clamp and inspect the weld for any defects, such as cracks, porosity, lack of fusion, etc. If you find any defects, grind them out and re-weld them until you have a sound weld.
Congratulations! You have successfully welded steel to aluminum using bimetallic transition inserts.
Factors Affecting Welding Steel to Aluminum
There are some factors that can affect the quality and performance of your welds when welding steel to aluminum using bimetallic transition inserts. Here are some of them:
- The quality of the bimetallic transition insert: The insert should have a good metallurgical bond between the steel and aluminum sides, without any cracks, voids, or delamination. The insert should also have a smooth surface and a uniform thickness.
- The compatibility of the filler materials: The filler materials should match the base metals in terms of chemical composition, mechanical properties, thermal expansion coefficients, etc. The filler materials should also have good weldability and corrosion resistance.
- The cleanliness of the base metals and the insert: The base metals and the insert should be free from any contaminants that can affect the weld quality, such as dirt, rust, paint, oil, grease, etc. The contaminants can cause porosity, lack of fusion, cracking, etc.
- The alignment of the base metals and the insert: The base metals and the insert should be aligned properly to ensure a good fit-up and avoid gaps or misalignment between them. The gaps or misalignment can cause distortion, stress concentration, cracking, etc.
- The welding parameters: The welding parameters should be adjusted according to the type of welding technique (GMAW or GTAW), type of filler material (steel or aluminum), thickness of base metals and insert, joint design, etc. The welding parameters should provide adequate heat input, penetration, fusion, etc., without causing excessive spatter, burn-through, distortion, etc.
Benefits of Welding Steel to Aluminum
Welding steel to aluminum using bimetallic transition inserts has many benefits compared to other methods of joining these dissimilar metals. Here are some of them.
- It creates a strong and permanent bond between the steel and aluminum parts, which can withstand high loads and stresses without cracking or failing.
- It reduces the weight of the assembly by using aluminum instead of steel for some parts, which can improve the fuel efficiency, performance, and environmental impact of the application.
- It eliminates the need for mechanical fasteners, such as bolts, nuts, rivets, etc., which can add weight, cost, and complexity to the assembly. Mechanical fasteners can also create stress concentration, corrosion, and fatigue problems in the joint.
- It allows for more design flexibility and creativity by enabling the use of different shapes and sizes of steel and aluminum parts. Welding can also create complex and curved joints that are difficult or impossible to achieve with mechanical fasteners.
- It improves the appearance and aesthetics of the assembly by creating a smooth and seamless joint between the steel and aluminum parts. Welding can also hide any defects or imperfections in the base metals.
Types of Welding That Can Be Used to Weld Steel to Aluminum
There are two main types of welding that can be used to weld steel to aluminum using bimetallic transition inserts: gas metal arc welding (GMAW) and gas tungsten arc welding (GTAW).
GMAW, also known as metal inert gas (MIG) welding, is a welding technique that uses a consumable wire electrode that is fed through a welding torch. The wire electrode melts and forms an arc with the base metals, creating a weld pool that fuses them together. The arc and the weld pool are protected from atmospheric contamination by a shielding gas that flows through the torch.
GTAW, also known as tungsten inert gas (TIG) welding, is a welding technique that uses a non-consumable tungsten electrode that is held in a welding torch. The tungsten electrode creates an arc with the base metals, creating a weld pool that fuses them together. The arc and the weld pool are protected from atmospheric contamination by a shielding gas that flows through the torch. A separate filler material is added to the weld pool manually or automatically.
Both GMAW and GTAW can be used to weld steel to aluminum using bimetallic transition inserts. However, there are some differences between them that you should consider before choosing one over the other. Here are some of them:
- GMAW is faster and easier than GTAW because it uses a continuous wire feed that eliminates the need for changing electrodes or adding filler material manually. GMAW also produces less heat input than GTAW, which reduces distortion and residual stress in the joint.
- GTAW is more precise and versatile than GMAW because it allows for better control over the arc and the weld pool. GTAW also produces higher quality welds than GMAW because it has less spatter, porosity, and oxidation. GTAW can also weld thinner materials than GMAW without causing burn-through or warping.
The choice between GMAW and GTAW depends on your preference, skill level, budget, and application requirements. You can also use a combination of both techniques to achieve optimal results.
Tools and Equipment Needed for Welding Steel to Aluminum
To weld steel to aluminum using bimetallic transition inserts, you will need some tools and equipment that are essential for any welding project. Here are some of them:
- A welding machine: You will need a welding machine that can perform either GMAW or GTAW (or both) depending on your choice of welding technique. The welding machine should have enough power output to weld the thickness of your base metals and insert. The welding machine should also have adjustable settings for current, voltage, wire feed speed, gas flow rate, etc.
- A welding torch: You will need a welding torch that is compatible with your welding machine and your choice of welding technique. The welding torch should have a suitable nozzle size and shape for your joint design. The welding torch should also have a comfortable grip and a flexible cable for easy maneuverability.
- A wire feeder: If you choose GMAW as your welding technique, you will need a wire feeder that can feed the wire electrode through the welding torch at a consistent speed. The wire feeder should have a spool holder that can accommodate different sizes of wire spools. The wire feeder should also have a tensioner that can prevent tangling or jamming of the wire.
- A filler material: You will need two types of filler material for welding steel to aluminum: one for welding steel to steel (such as ER70S-6) and one for welding aluminum to aluminum (such as ER4043). The filler material should match the base metals in terms of chemical composition, mechanical properties, thermal expansion coefficients, etc. The filler material should also have good weldability and corrosion resistance.
- A shielding gas: You will need a shielding gas that can protect the arc and the weld pool from atmospheric contamination. The shielding gas should be inert or slightly reactive depending on your choice of welding technique and filler material. For example, you can use argon or argon-helium mixtures for both GMAW and GTAW, or you can use argon-carbon dioxide mixtures for GMAW only.
- A gas regulator: You will need a gas regulator that can control the flow and pressure of the shielding gas from the gas cylinder to the welding torch. The gas regulator should have a gauge that can display the gas pressure and a valve that can adjust the gas flow rate.
- A gas hose: You will need a gas hose that can connect the gas cylinder to the gas regulator and the gas regulator to the welding torch. The gas hose should be long enough to reach your work area and flexible enough to avoid kinking or twisting. The gas hose should also be compatible with your shielding gas and have leak-proof fittings.
- A bimetallic transition insert: You will need a bimetallic transition insert that has steel on one side and aluminum on the other. The insert should have a good metallurgical bond between the two metals without any cracks, voids, or delamination. The insert should also have a smooth surface and a uniform thickness.
- A clamp: You will need a clamp that can hold the base metals and the insert together during welding. The clamp should have enough clamping force to prevent any movement or misalignment between them. The clamp should also have protective pads or jaws that can prevent any damage or marks on the base metals or the insert.
- A wire brush: You will need a wire brush that can clean the base metals and the insert before welding. The wire brush should have stiff bristles that can remove any dirt, rust, paint, oil, grease, etc. from the surfaces. The wire brush should also have a comfortable handle and a suitable size for your work area.
- A grinder: You will need a grinder that can prepare the base metals and the insert for welding. The grinder should have an abrasive disc that can cut, grind, or smooth the edges of the base metals and the insert. The grinder should also have a guard that can protect you from sparks and debris.
- A welding helmet: You will need a welding helmet that can protect your eyes and face from the intense light and heat of the arc. The welding helmet should have a lens that can filter out harmful ultraviolet and infrared rays and adjust to different levels of brightness. The welding helmet should also have a headband that can fit your head comfortably and securely.
- A pair of welding gloves: You will need a pair of welding gloves that can protect your hands from burns, cuts, shocks, etc. The welding gloves should be made of leather or other heat-resistant materials that can withstand high temperatures. The welding gloves should also have a good grip and dexterity for handling the welding torch and filler material.
- A pair of welding pliers: You will need a pair of welding pliers that can help you with various tasks during welding, such as cutting, bending, or holding the wire electrode or filler material. The welding pliers should have sharp blades and strong jaws that can cut or grip different sizes of wires. The welding pliers should also have insulated handles that can prevent electric shocks.
These are some of the basic tools and equipment that you will need for welding steel to aluminum using bimetallic transition inserts. However, depending on your specific project, you may also need some additional tools and equipment, such as a workbench, a vice, a hammer, a chisel, etc.
Safety Precautions to Take When Welding Steel to Aluminum
Welding steel to aluminum using bimetallic transition inserts is not only challenging but also hazardous. There are many risks involved in this process, such as electric shocks, burns, fires, explosions, fumes, etc. Therefore, you should always take some safety precautions when welding steel to aluminum to prevent any accidents or injuries. Here are some of them:
- Wear proper protective gear: You should always wear appropriate protective gear when welding steel to aluminum, such as a welding helmet, gloves, pliers, boots, apron, etc. These items can protect you from various hazards, such as sparks, spatter, heat, radiation, etc.
- Work in a well-ventilated area: You should always work in a well-ventilated area when welding steel to aluminum because this process can produce harmful fumes and gases that can affect your health. You should also use an exhaust fan or a fume extractor to remove any fumes or gases from your work area.
- Keep flammable materials away: You should always keep flammable materials away from your work area when welding steel to aluminum because this process can generate sparks and heat that can ignite them. You should also keep a fire extinguisher nearby in case of any fire emergencies.
- Check your equipment regularly: You should always check your equipment regularly before and after welding steel to aluminum to ensure that they are in good working condition. You should also inspect your equipment for any signs of damage or wear and tear that can affect their performance or safety.
- Check your connections and cables: You should always check your connections and cables before and after welding steel to aluminum to ensure that they are secure and free from any defects or damages. You should also avoid any contact with live wires or electrodes that can cause electric shocks or burns.
- Follow the manufacturer’s instructions: You should always follow the manufacturer’s instructions when using your welding machine, torch, wire feeder, gas regulator, etc. The manufacturer’s instructions can provide you with valuable information and tips on how to use your equipment safely and effectively.
- Seek professional help if needed: You should always seek professional help if you encounter any problems or difficulties when welding steel to aluminum. You should also consult a qualified welder or instructor if you are not sure about any aspect of the process or if you want to improve your skills and knowledge.
These are some of the safety precautions that you should take when welding steel to aluminum using bimetallic transition inserts. However, these are not the only ones. You should also follow the general safety rules and guidelines for welding, such as wearing eye protection, keeping children and pets away, avoiding distractions, etc.
Troubleshooting Tips for Welding Steel to Aluminum
Welding steel to aluminum using bimetallic transition inserts is not a foolproof process. There are some common problems and issues that can arise during or after welding, such as cracking, porosity, lack of fusion, distortion, etc. These problems can affect the quality and performance of your welds and cause failures or defects in your assembly.
However, these problems are not inevitable. There are some troubleshooting tips and solutions that can help you prevent or fix them. Here are some of them:
- Cracking: Cracking is one of the most serious problems that can occur when welding steel to aluminum. Cracking can occur due to various reasons, such as thermal expansion mismatch, intermetallic formation, stress concentration, etc. Cracking can reduce the strength and durability of your welds and cause them to break or fracture under load.
- To prevent cracking, you should use bimetallic transition inserts that have a low coefficient of thermal expansion (CTE) and a low intermetallic content. You should also use filler materials that have a similar CTE and chemical composition as the base metals. You should also preheat the base metals and the insert before welding to reduce thermal stress and avoid rapid cooling after welding. You should also use proper joint design and welding technique to minimize stress concentration and distortion in the joint.
- To fix cracking, you should first identify the type and location of the crack. You should then grind out the crack and re-weld it using the same filler material and welding technique as before. You should also inspect the weld for any other defects or cracks and repeat the process until you have a sound weld.
- Porosity: Porosity is another common problem that can occur when welding steel to aluminum. Porosity is the presence of small holes or voids in the weld metal that are caused by trapped gas or air bubbles. Porosity can reduce the strength and appearance of your welds and cause leaks or corrosion in your assembly.
- To prevent porosity, you should use clean base metals and insert that are free from any contaminants that can produce gas or air bubbles during welding, such as dirt, rust, paint, oil, grease, etc. You should also use a shielding gas that is inert or slightly reactive depending on your choice of welding technique and filler material. You should also use proper welding parameters that provide adequate heat input, penetration, fusion, etc., without causing excessive spatter, burn-through, distortion, etc.
- To fix porosity, you should first identify the size and location of the pores. You should then grind out the pores and re-weld them using the same filler material and welding technique as before. You should also inspect the weld for any other defects or pores and repeat the process until you have a sound weld.
- Lack of fusion: Lack of fusion is another common problem that can occur when welding steel to aluminum. Lack of fusion is the incomplete melting or joining of the base metals or the insert during welding. Lack of fusion can reduce the strength and integrity of your welds and cause them to separate or detach under load.
- To prevent lack of fusion, you should use bimetallic transition inserts that have a good metallurgical bond between the steel and aluminum sides without any cracks, voids, or delamination. You should also use filler materials that have good weldability and compatibility with the base metals. You should also use proper welding parameters that provide adequate heat input, penetration, fusion, etc., without causing excessive spatter, burn-through, distortion, etc.
- To fix lack of fusion, you should first identify the extent and location of the lack of fusion. You should then grind out the affected area and re-weld it using the same filler material and welding technique as before. You should also inspect the weld for any other defects or lack of fusion and repeat the process until you have a sound weld.
- Distortion: Distortion is another common problem that can occur when welding steel to aluminum. Distortion is the change in shape or size of the base metals or the insert due to thermal expansion and contraction during welding. Distortion can affect the fit-up and alignment of your assembly and cause stress, cracking, or warping in your welds.
- To prevent distortion, you should use bimetallic transition inserts that have a low coefficient of thermal expansion (CTE) and a uniform thickness. You should also use filler materials that have a similar CTE and chemical composition as the base metals. You should also preheat the base metals and the insert before welding to reduce thermal stress and avoid rapid cooling after welding. You should also use proper joint design and welding technique to minimize heat input and distortion in the joint.
- To fix distortion, you should first measure the amount and direction of the distortion. You should then use a hammer, a chisel, a vice, or a press to bend or straighten the distorted parts until they are back to their original shape and size. You should also inspect the weld for any defects or cracks and repeat the process until you have a sound weld.
These are some of the troubleshooting tips and solutions that can help you when welding steel to aluminum using bimetallic transition inserts. However, these are not the only ones. You should also follow the general troubleshooting rules and guidelines for welding, such as checking your equipment, connections, cables, etc.
Wrap Up: Welding Steel to Aluminum
Welding steel to aluminum is a challenging but rewarding process that can help you create strong and lightweight assemblies for various applications. However, welding steel to aluminum is not easy due to their different properties that make them incompatible for welding. Therefore, you need to use some special techniques and methods to overcome these challenges.
The secret to welding steel to aluminum is using bimetallic transition inserts. These are special pieces of metal that have steel on one side and aluminum on the other. They are pre-bonded by using a hot rolling or hot pressure welding technique (also known as explosion welding). These techniques create a metallurgical bond between the two metals without melting them.
Bimetallic transition inserts are thick enough that you can use regular welding techniques (such as GMAW or GTAW) to weld them to their respective metals. For example, you can use GMAW (MIG) or GTAW (TIG) to weld the steel side of the insert to a steel part, and then use the same technique (with different filler material) to weld the aluminum side of the insert to an aluminum part.
By using bimetallic transition inserts, you can avoid the problems associated with direct welding of steel and aluminum, such as melting point mismatch, intermetallic formation, thermal expansion mismatch, etc. The inserts act as a buffer zone between the two metals and provide a smooth transition from one metal to another.
Conclusion
We have gone hopefully described to you how to weld steel to aluminum using bimetallic transition inserts step by step. We have also covered the factors that affect the quality of the joint, the benefits of welding steel to aluminum, the types of welding that can be used for this purpose, the tools and equipment that you need, the safety precautions that you should take, and the common mistakes that you should avoid.
Hopefully we have provided you with enough information and tips on welding dissimilar metals to be able to successfully attempt to weld steel to aluminum. Practice is important, experiment on scrap pieces of metal first to get confidence and improve your skills and knowledge on welding steel to aluminum before starting your main project .
Videos

I’ve been involved in the welding industry for over twenty years. I trained in various engineering shops working on various projects from small fabrication and repairs through to industrial projects.I specialize in welding aluminum and food grade stainless steel and an now run an engineering shop fabricating equipment for the food industry.